
-Pre-Chapter Shopping: Forged Wind with +5 Mt (assumes 15 Mag and Tomes A).
-Tonics: Robin (Def), Chrom (Str), Fred (Def)
Terminology
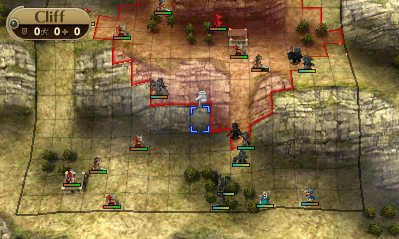
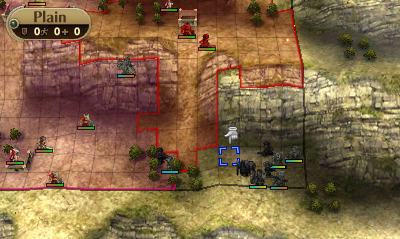
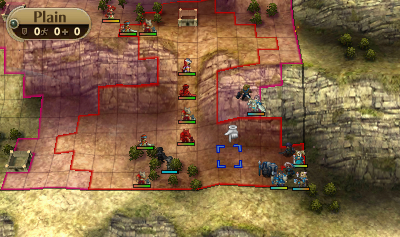
-Note that I’ll be using abbreviations for the enemies here. UDM, UMyrm and UBarb are the north Dark Mage, Myrm and Barb. From top to bottom on the left: LBarb1, LMyrm, LDM and LBarb2. The lone Barb on the left side of the very middle area is MBarb.
Kiting Strats
Robin Goes Up the Middle
-Note that this strategy is only reliable if MBarb doesn’t have Counter.
-Robin goes up to kill either UBarb or UMyrm. UMyrm may be preferred, as despite UBarb having higher damage output, Ricken has much higher chance of hitting him and the UBarb has poorer Hit against Robin.
-If both UBarb and UMyrm don’t have Pass (one is okay, since Robin can kill it, while Ricken weakens the other to avoid Counter), Vaike can unequip lure LBarb1 over to make it so Fred doesn’t have to face Counter or Luna+ (either will kill him after LDM’s damage). Then Fred can fight the LDM by equipping the Orsin’s and positioning on the right of the left Woods tile. If LBarb1 is still alive, then Robin can come back on turn 2 to kill it, yet remain in range of the right-side Wyv. She needs to be prepared to face a lot of attacks, though, as she will be targeted by LBarb2, the Wyv and MBarb (who must die, otherwise the Wyv will not die either). The Myrm and DM will more likely go for Fred if he’s still using the Orsin’s. This runs into a lot of potential issues with Counter, although the forged Wind has a good chance of taking the Wyv out of that equation (unless Aegis+/Counter). Can possibly do a single Rescue bomb attack to weaken a Counter enemy. Alternatively, Robin can be Rescue heal bombed.
-The advantage of this strat is that Robin has a lot of room to kite around the middle platform and most reinforcements will gun for her first. The downside is that the rest of the team has to be able to deal with the remaining L-goons, plus the Barb and DM reinforcements that will come from the lower-left Fort. To really go for this variation, it’s almost imperative that the Fred with Lon’qu/Sumia setup kill the LDM. It may also be workable if they manage to kill LBarb1, though.
Robin Sticks With the Group
-While middle strats separate Robin from the group in a bid to prevent the scrubs from being a liability, these strats give Robin access to Lissa and Maribelle heals, as well as the rest of the group being able to dogpile isolated enemies. The most detail is going to be in the openings, with some turn 2 and 3 follow-up. The rest will be general advice, because depending on which enemies one deals with, the permutations are too numerous for step-by-step.
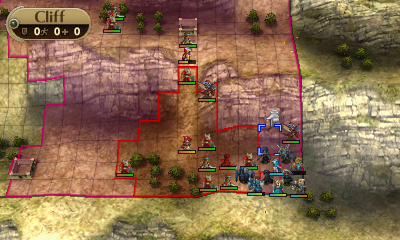
General Opening Positions
-Note that this screenshot isn’t exactly how a single opening is supposed to look. Ideally, only some portion of it should be used, but I’ve consolidated it using units are markers for convenience’s sake.
-First off, if the L-Team is light on Counter, Robin will have an easier time engaging them than any other formation. Variations of this include sitting in the Woods to 1 tile left of Fred (0 melee Counter) or running into the group and picking off one of the melee who have Counter (1-2 melee Counter). Fancier positioning with other units will be required to attempt to deal with 3 melee Counter. I’ll get into that as I elaborate on the positions of other units.
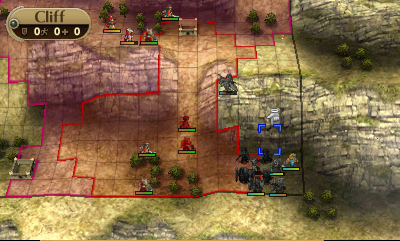
-If Robin is placed where Robin/Chrom is, this will pull UDM, UBarb, UMyrm and LBarb1 onto her. It’s a good way to clear a chunk of enemies if tackling the full left side isn’t possible. However, it does have some requirements, the most basic being for only one of UBarb and UMyrm having Counter. Preferably, there isn’t any between the two, but if there is, Ricken can help Robin deal.
-Where Ricken is is the ideal default attack. This should put UMyrm in range of getting taken down in one more hit from the forged Flux (barring Aegis+). Same scenario with UBarb, but care must be taken to monitor Lissa’s Mag. She requires 6 Mag and Miriel to Rescue Ricken from attacking UMyrm, but needs 8 Mag to Rescue him from attacking UBarb. If neither enemy has Counter, Ricken should weaken UMyrm. Even if Robin isn’t in range, it will make things easier on the rest of the party on turn 2.
-Where Fred is allows him to engage LBarb1 and LDM. He should have a Spd pair-up and the Orsin’s so that he can double LDM. This is preferably Lon’qu with the Killing Edge, as one Dual Strike from him will result in a non-Pavise+ LDM dying. LBarb1 should also not have Counter or Luna+, otherwise Fred risks dying.
-Where Vaike is serves exactly one purpose: to stand there unequipped and take it in the face from a Counter LBarb1. He will need a Spd pair-up to not get doubled, but this is practically guaranteed to pull the heat off of Robin and Fred. However, Robin must be positioned where Robin is for this to work. Otherwise, U-Team will just maul him.
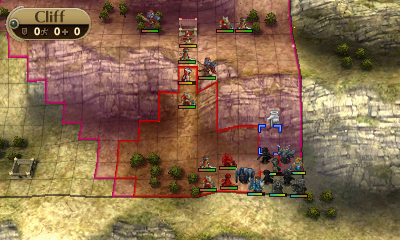
-If Robin foregoes the position where Robin is on the map and UBarb doesn’t have Counter, then Fred can position 1 tile right of where he is on the map. UBarb will move first, allow Fred to injure him without fear of UMyrm. Take care to make sure UBarb won’t die if Fred has a pair-up partner who could Dual Strike or lets him double.
-Where Sumia is will lure UDM into attack her. She will want to do this if Robin is not positioning where Robin is on the map. Otherwise, UDM will be a constant, if not, deadly threat, to the rest of the team—especially Fred. If UDM has Anathema and Lon’qu is free, partner him to her to reduce the chance of crit-blick.
-Lon’qu’s position allows him to pull a Counter LBarb2 off of Robin. However, if Robin is not moving aggressively on the left side, Lon’qu can still work to weaken LBarb2. He will typically want a +Str, +Def partner and the Killing Edge, among other restrictions. LBarb2 absolutely cannot have Hawkeye. If he has Pavise+, Lon’qu will want the Bronze or Iron Sword instead (as a crit here will cause Lon’qu to self-destruct). Note that there’s still some risk here, as there’s a 20.80%/14.85% true hit chance (second figure assumes Gamble) of Lon’qu dying, so only do this if desperate for the damage output (if it looks like Robin won’t be able to fight many enemies on EP due to Counter). Otherwise, it’s safer to use an unequipped Vaike with Lon’qu as the partner as the lure. Alternatively, someone can be positioned 1 tile to Lon’qu’s right, giving him only a 9.90%/5.95% chance to be hit. This is less risky for him, but requires Robin to hit certain benchmarks. Unless she has very high Def (over 14 before Tonic) or manages to keep the Avoid gap between her and Lon’qu small (somewhere less than 18, with 8 confirmed to work), the Barb has a significant chance of targeting her instead.
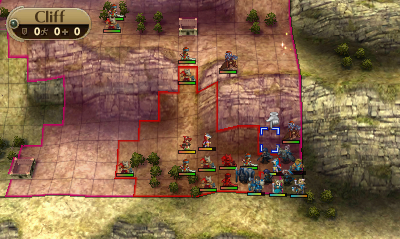
Turn 1
-To make any of these strats work, Sumia’s opening move must be to disrupt UDM using the same cliff positioning as in the turtling strats.
-Like with the middle strat, Ricken can weaken UBarb or UMyrm before getting rescued.
-If L-Team has no melee Counter, then Robin can sit in the left Wood tile and enjoy superior Def and Avoid. Take care to have the Flux equipped if facing Aegis+.
-If L-Team has 1 melee Counter, then Robin can run in and kill that unit, then duke it out with the others on EP. This can be dangerous if the meleer who dies isn’t LMyrm and there is lots of Luna+ present. Note that if that single melee Counter enemy isn’t LBarb1, Robin won’t be able to reach the right Wyv’s range on turn 2 without Rescue or Transfer shenanigans.
-If L-Team has 2 melee Counter, then one of them must be LBarb2, otherwise things get extremely risky. Depending on what the enemy’s U-Team looks like, this may still be risky. In particular, too much PavGis+ between LBarb2, UBarb and UMyrm can kill this strat. Regardless, Robin must kill the melee Counter who isn’t LBarb2.
-There are several ways to deal with the LBarb2. This first is to place an unequipped Vaike with Lon’qu support on the lower-left Woods tile. This doesn’t so much deal with him as defer the killing, which can make things difficult if UBarb has Counter, since even the whole team might not have enough damage to kill three unharmed enemies (depending on PavGis+ distribution). However, this is the only option that allows for a Counter/Hawkeye combo on LBarb2.
-The rest of the ways all involve taking advantage of Lon’qu’s high Avoid. 23 base + 10 Avoid skill +20 WTA vs axes + 10 for support rank 2 + 10 Woods = 73. Barbs have 95 Hit, which drops to 22 against him (17 if the Barb has Gamble). This should generally allow Lon’qu to dodge (the Barb will have 9.90%/5.95% true hit) so he can face tank the Counter damage for his counterattack. The support rank 2 is generally achieved by having Vaike in his pocket and anyone free (likely Virion) to his right. If LBarb2 doesn’t have Pavise+, Lon’qu can use the Killing Edge and if it crits, the Barb will die. Against Pavise+, he should use the Bronze or Iron Sword (otherwise, Lon’qu will self-destruct on a crit). There is a quirk with this method in that Lon’qu’s high Avoid starts to work against him when the Barb doesn’t think it can one-shot him (which Vaike’s +2 Def ensures). Unless Robin has very high Def (over 14 before Tonic) or manages to keep the Avoid gap between her and Lon’qu small (somewhere less than 18, with 8 confirmed to work), the Barb has a significant chance of targeting her instead. Depending on enemy skills, she could still tank the damage and end up with single-digit HP at the end of EP, but it will very likely require the LDM to not be a threat and for her to take only one non-Luna+ hit from either of the melee (somewhat likely, but getting that situation is far from guaranteed). Any hope of getting over the threshold without being insanely blessed will require having a Fred C support and him as the partner (which carries the risks of lower Dual Strike rates).
-The third way attempts to address the second method’s flaw without using Fred, but is taking a low risk chance that could end the run (or at least the deathless part of it) to do so. This involves not having any support partner in order to drop Lon’qu into range of being one-shot by the Barb. This will cause him to be automatically targeted regardless of Robin’s stats. However, this does drop his Avoid by 10 (giving the Barb 20.80%/14.85% true hit) and cost him 4 Str, which means that he also can’t use the Killing Edge (a crit will implode him). Theoretically, Sumia could let him retain his Avoid (but still stop him from being able to use the Killing Edge due to doubling), even granting a bit more than before, but she’s busy with UDM.
-No matter what Robin does, Fred has a chance to contribute to turn 1, provided that UBarb doesn’t have Counter. If Fred equips a Bronze Sword or the Silver Lance and sits 1 tile above Virion, he can damage UBarb for next turn. If using the lance and UBarb doesn’t have Pavise+, make sure that either he is not attacked by Ricken or that Virion is unequipped, as UMyrm can do some serious damage to a lone Fred (and just plain murder him if spawned with Luna+).
Turn 2
-0-or-1-melee-Counter strat: Now the party has to use whatever it has to finish off UBarb and UMyrm. Ideally, UMyrm is weakened enough that Fred, or at least a sequence of Virion/Fred, then Vaike taking Fred and swapping to Fred, can finish UMyrm. This then allows UBarb to hopefully be softened up by the other so that Robin can kill him from 1 tile above (assuming he has Counter, otherwise, Robin can just fight head on). With the Wind equipped, this puts her in range of UDM, MBarb and the approaching Wyv, so make sure she has enough durability left! If MBarb has Counter, this strat is probably torpedoed and she should attack from the left instead (to get her closer to the left Wyv).
-In the end, Robin may have to kill UMyrm with the forged Wind instead, especially if he has Avoid+10, while Fred and co. kill the UBarb. It really all depends on PavGis+ distibution. Also note that Robin won’t be able to get above the UBarb on her own if she had to kill someone who wasn’t LBarb1 on T1 PP.
-2-melee-Counter strat: Now the party has to use whatever it has to finish off LBarb2, UBarb and UMyrm. Depending on how hurt the enemy is and their PavGis+ distribution, killing them all may not be possible. In the very least, it’s likely that no one will be able to miss without losing the run. As with the 0-1-melee-Counter method, Robin prefers to end her turn in good health while 1 tile above UBarb. It’s pretty unlikely, as unless rather lucky, there won’t be enough actions to keep Robin healed, but I’m mentioning it just in case the opportunity comes up.
-Try to make sure that someone with 7 Move is within 8 tiles of the lower-left Fort. Sumia is usually a good candidate for this.
Turn 3
-Generally speaking, the left Wyv should now be in range of getting taken down by Robin. If Robin was unable to kill the right Wyv and associated enemies, be aware that she will likely have to be in the right Wyv’s range, whether due to the left Wyv’s positioning or needing to purposefully engage the right Wyv on enemy phase in order to keep everyone else safe. Try to get her healing as appropriate.
-Remember the unit who is supposed to be within 8 tiles of the lower-left Fort? If that unit is within 6 (or Sumia and within 7), that unit can move directly onto the Fort. Otherwise, move right next to it and separate that unit’s partner onto the Fort to body block the Barb from spawning.
-This is where even the scattered play-by-play breaks down, especially with random reinforcement skills. Careful positioning and possibly even Rescue bombing on Counter enemies may be required. The rest here will be largely general advice.
Turn 4
-Try to start clearing back to the right side, as the Wyv reinforcements from the top-left will be coming soon. Depending on what skills the 1~2-range Barb spawned with, this may be difficult, though, as Robin could end up having to be committed to that. But he has to die too, or there’s no getting away.
-Leave someone free near the Fort. Preferably unpaired so that they can hop on someone else on T5.
Turn 5
-This is the last turn Robin can commit to clearing the right before having to engage the Wyvs (or else everyone else is gonna get trapped when the right Wyv reinforcement shows up at the end of this turn). Start moving as far right as feasible.
-The Wyvs won’t be able to reach the lower-left Fort yet. So if other enemies have been cleared away from that left side, someone can safely body block the DM from spawning.
Turn 6+
-Get the Wyvs on the left with Robin, but be aware of what the Myrms have for skills. They may require more kiting, but that’s fine so long as the Wyvs die.
-Try to lure the right Wyv with Fred. The idea is to get it down to the party’s attack range over the next two turns. This allows them to team up on it and kill it while Robin deals with the remaining Myrms and leftside Wyv. Be aware of the Barb coming down the middle. If it looks too dangerous for the scrubs, see if Robin can go for the kill.
-If the lure strat doesn’t work out, push back to the left. This can get risky if there’s lots of Counter and there will be very little safe space between the Wyvs for everyone to hide (Robin absolutely must get the left Wyv kills in this scenario). Fred and Vaike (with a Spd pair) will likely have to body block on the right to provide enough safe space. This then allows the party to push back right after, with Robin killing the Wyv, leaving the rest of the party freedom to retreat to the right.
-After either of those strats, the enemy’s numbers should be dwindling enough to muscle through whatever remains.
Adaptations to Interceptor’s Turtle Strats:
Find the original strat here.
Note: This strat really only works for squishy Robins. If she is too durable (usually in the 15-Def range post-Tonic), the enemies will target Fred instead and he will die very quickly. If Robin is durable, it is usually better to go on the offensive. In fact, 13 Def post-tonic is usually enough to allow for offensive strats.
This strat is also generally obsolete because kiting is not only quicker, but gives the enemies fewer attacks, balancing out the luck factor. Leaving it in in case people have exceptionally weak Robins and need to consider it.
Prereqs
-13 uses left on the Javelin (just enough for base Sumia paired with Vaike to kill a Pavise+ Barb) or the Orsin’s Hatchet. If using the Javelin, Sumia must have it unequipped at the start if it’s got less than 15 uses. Backup strat: can trade over Ricken for Vaike for the final hit if short on Javelins.
-Chrom Swords C for Killing Edge
-Lissa with either 8 Mag, so she can use Lon’qu, or 7 Spd, so she can use Miriel. If she meets both criteria, Miriel is preferred. If she meets neither and has 6 Spd, she has to use Miriel and hope for a Spd level up from the first two turns of staff EXP.
Setup
-Bring Killing Edge on Chrom
-Robin placed to be able to reach Chrom
-Lissa placed to be able to reach the right border of the map
-Lon’qu placed to be able to reach Lissa
-Sumia placed above Chrom
-Vaike placed to be able to reach Sumia
-I tried many permutations of the strategy to get my units to face certain enemies. The big main problem I ran into was thinning the enemies out too much in key places, making it so I couldn’t easily assassinate problem enemies. To further complicate things, the base strategy had a chance of failing for lack of enemy density too. The reason that this would fail is because of random enemy movements. Sometimes enemies would fixate on Robin for no real reason (I could run the same scenario over and over from battle save and it would change without me altering conditions, which is the same reason why C1 has two routes). This would sometimes leave a hole 2 tiles to the left of Fred in the tanking formation. Since timing is tight, this would generally be right when a mage is arriving, meaning the melee won’t fill that spot and Fred will almost certainly die. After much experimentation, I found that the goal for a reliable body block situation is to have at least 6 (preferably, 7) enemies, of which the 5 closest must be melee. I’ve found three relatively reliable strategies that allow for shuffling the melee around to minimize the threat to Robin and Fred.
LBarb1 vs Robin and UBarb vs Fred
-Do not use a Sumia decoy (give her to Vaike right away)
-On turn 1, get everyone other than Robin as close to tanking formation as possible.
-Position Robin 2 tiles left of where she normally stands to tank.
-As tempting as it might be, do not Rescue bomb anything on turn 2, as it’s almost guaranteed to create the gap that kills Fred.
-On turn 3, assume the standard tanking formation.
Robin Facing LMyrm and Fred facing UBarb
Turn 1
-Pair Ricken to Maribelle, then move her all the way down until she hits Cliff, then 1 tile left of that.
-Pair Lon’qu to Lissa. Move her until she’s 2 tiles up and 2 tiles left of the map’s SE border. Rescue Maribelle.
-Pair Robin to Chrom. Swap to Robin and equip Thunder (or forged Flux if either LBarb1 or LDM have Aegis+). This will kill LDM and LBarb1 on EP. Note that if the LDM has Aegis+, even Average 16 Mag Robin will only do 10 x2, meaning Chrom needs to score a DS with a Killing Edge or what remains of the Glass Sword to get the kill.
-Sumia goes 3 tiles up, then 2 tiles left.
Turn 2
-Sumia goes 5 tiles right and 1 tile down.
-Move Vaike to the right of Lissa.
-A back-up strat for if LDM didn’t die is for Robin to finish him off on turn 2, then have Lissa Rescue Robin back into place (transfer for Ricken if necessary). Since Maribelle blocks the spot below and Vaike blocks the right, with Cliff being invalid for a foot unit, Robin will end up to Lissa’s left. After that, have Fred trade-convoy Robin’s weapons (make sure to unequip him after too).
-If no back-up strat required, Robin can just walk over to the spot left of where she normally stands and unequip.
-Maribelle needs to stay where she is because she body blocks Pass enemies. If Ricken was transferred away from her, transfer him back.
Turn 3
-Pair Sumia to Vaike
-Shuffle anyone who isn’t in Interceptor’s tanking formation into said formation.
Robin Facing LBarb1 and Fred facing LMyrm
Turn 1
-Pair Vaike to Sumia. Sumia goes 1 tile up, then 4 tiles right.
-Position Robin 2 tiles left of where she normally stands to tank.
-Pair Ricken to Maribelle. Move Maribelle all the way down to the Cliff and wait there.
-Pair Lon’qu to Lissa. Lissa moves to 2 tiles up from the SE border of the map. Rescue Maribelle.

Turn 2
-Don’t move Sumia. She’ll fight UDM on EP (not necessary to damage, but need to delay his approach).
-Robin kills the LDM. Note that if the LDM has Aegis+, even Average 16 Mag Robin will only do 10 x2, meaning Chrom needs to score a DS with a Killing Edge or what remains of the Glass Sword to get the kill. Since the Rescue bomb is part of the initial strat, there is no back-up strat, so only do this against Aegis+ if the UBarb has a super-awful skillset.
-Lissa Rescues Robin (transfer Ricken, if necessary).
-If Ricken was transferred away, transfer him back.
-Fred trade-convoys Robin’s tomes (make sure to unequip him after).
Turn 3
-UBarb should have attacked Fred. Kill UBarb with Robin.
-Move Fred 1 tile left. Heal, if necessary.
-Move Lissa below Robin and trade-convoy her tome. Heal someone, if necessary (prioritize Robin).
-Move Sumia to where Lissa was and swap to Vaike.

Delayed Turtle
Pre-Reqs
-Very blessed Robin in terms Spd and Def
-At least 1 use of the Elixir left
-Only 1 Counter enemy on the left side (preferably the Myrm; even better if 0 Counter)
-Want the Aegis+ density on the left side to be relatively low too.
-Of the upper Barb and Myrm, Robin has to be able to kill one, with the second being killable by everyone else ganging up on him.
Turn 1
-Pair Ricken to Maribelle. Move Maribelle down into Rescue range. Have Lissa Rescue her.
-As long as Robin attacks the left-side Counter enemy from as far right and as far up as she can, she can reach the upper group next turn. If there are no Counter enemies, she can hop in the Woods to the left of Chrom’s starting position.
-Move Sumia up 3 tiles, then left 2 tiles
-If the upper Barb doesn’t have Counter, Fred can pick up some bonus damage to make the strat safer by moving into the very bottom of his attack range. The Barb will body block the Myrm, so no need to worry about him.
Turn 2
-Move Robin back right, making sure to attack from as far left and as far down as possible.
-Fred and the rest clean up the other guy.
-Move Sumia down 5 tiles, then left 1 tile.
-Position Vaike 2 tiles left of the bottom-right border of the map.
Turn 3
-Pair Sumia to Vaike.
-Move Robin to 1 tile down from the left-most Woods of the nearest Woods clump. Equip the Wind and heal as necessary. She will be fighting both Wyvs and a Dark Mage.
-Get everyone else as close to standard tanking formation as possible.
Turn 4
-Move Robin 2 tiles to the right. Kill the Mage.
-Have Lissa Rescue Robin into her tanking position.
-Transfer Maribelle temporarily to Vaike’s position to get Robin a heal. Make sure to trade-convoy Robin’s weapons too.
Turn 5
-Transfer Maribelle back to her normal position.
-Because of the timing offset before the last four Wyverns arrive, if Fred is facing a Luna+ Barb, it is preferable to clear out the tile two tiles to the left of Robin so that she can kill the last two 2-rangers so that they can’t double team Fred with the Luna+ Barb. If said Luna+ Barb does not have Counter, Fred can get 15 more Avoid for those crucial two turns by equipping a Bronze Sword (make sure to unequip Kellam!). Otherwise, it is likely possible to tank as normal, eliminating the Wyverns first, since there’s still enough melee that arrive early enough to body block the 2-rangers.
General Turtling Info
-Swapping Fred and Robin’s tanking positions causes UBarb and UMyrm to both target her. If none of the above strats will let Fred properly tank a melee, then this is a sort of last resort simply because it has better odds than Fred having a 99% chance of dying. This will be much more intensive on the healing front and it’s quite likely that it will run dry on the run’s budget of Vulneraries. If Robin is capable of this, though, it’s likely better to go on the offensive instead.
-If Lissa is using Lon’qu as a pair, if she acts before Maribelle, she can transfer for Ricken for a temporary healing boost, then Maribelle can take Ricken back.
-Str+2 or Luna+ will keep Vaike from being able to survive on just Mend from Maribelle/Ricken. If either of those hit him or are in range after any other Wyv just hit him, he will need to use a Vulnerary to supplement.
-Note that the Short Axe Barb will also target Lissa if he can double her, so make sure that doesn’t happen.
Notes for The Second Tanking Formation (After All Wyverns Dead)
-Sumia with the Javelin and Vaike pair can slowly chip the enemy to the left of Robin to death, even through Pavise+ (therefore, the 13 Javelin uses). Watch out for crits and make sure Sumia and Vaike are both healed to full before landing the final hit (otherwise, 2-rangers will kill them).
-For 2-range ganking, kill the guy two tiles to the left of Robin to start pulling mages in. Trade chain the Mend over to Lissa. Chain the Heal back to Maribelle if something decides to go after Fred. Otherwise, Lissa will need to pour as much healing as possible into Robin (transfer Ricken to her if necessary).
-Short Axe Barb will try to gank Maribelle and will very likely kill her. Swap Vaike into her place when the Short Axe guy is within range (make sure he has Maribelle as the partner, or else he’ll get doubled and die).
-If Fred keeps a sword equipped, he can sometimes discourage Barbs from attacking him. This is very important if the closest Barb during the shuffle into second formation has Luna+, as it will otherwise target him and set up him for death by mage.
-Robin should use the forged Flux, even against non-Aegis+, when leading against 2-rangers. Against non-Aegis+, it’s enough damage that a Chrom dual strike can kill them before they can counterattack. This saves on crucial amounts of healing.
Reinforcements
-Turn 3: Barbs from mid-left and lower-left Forts. Myrm from upper-mid Fort.
-Turn 4: Wyvs from upper left Forts.
-Turn 5: Dark Mage lower left Fort, Myrm mid-left Fort, Barb middle Fort, 1 Wyv each top corner Fort.
Boss Pull
-Get Robin just barely into range of the closest right side Wyv. This will be the only Wyv to engage her this EP. If it has Counter of Aegis+, use the forged Wind and Falchion.
-Next turn, move to Fort. Face Boss and 1 melee Wyv.
-Next turn, either face last 2 Wyvs while on Fort, or snipe one from the Woods and deal with the last on EP (depending on HP levels and enemy skills).
