
Tonics: Lissa (Mag)
-Pre-Chapter Shopping: Flux, Def Tonic x5, Mag Tonic x7
Setup
-Robin in the lower-left slot. Cordelia, Fred, Ricken and Lissa can just go wherever.
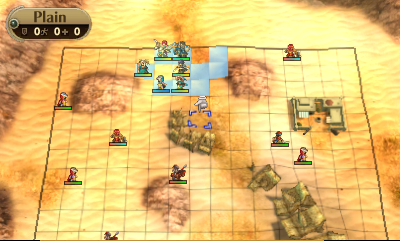
Turn 1
-Move Robin down to attack Fighter. Do it from 1 tile right, 1 tile down from the Fighter to catch the Cavalier in it too, even if it has Counter. The one time to forgo this would be if the Dark Mages pose a legit threat to Robin.
-Move Cordelia/Fred and Lissa/Ricken into position just outside of the DMs’ range.
-Move Nowi/Gregor to the top-left of the small safe zone near them.
-EP: Robin kills two DMs and possibly a Cav.
Turn 2
-If the Cav didn’t die, kill it. Look for a good ending spot to draw in the rest of the DMs.
-Move Nowi/Gregor up as far as possible.
-Move Lissa up and Rescue Nowi/Gregor.
Turn 3+
-Once the DMs are all dead, draw the rest of the enemies into the sands. Their movement will be terrible, whereas our team is set up to dance circles around them. This should allow Robin to isolate and pick off Counter enemies 1-2 at a time. it’s okay to eat a Counter in order to thin them out, since Robin can move evasively and Lissa can dispense healing next turn. Also, the enemy movement is so bad that an unequipped Robin can just continually body block, with Lissa hiding behind her, until she’s healed.
-Cordelia can attract melee up to the top-left hill. Thanks to their poor movement, there’s always a safe spot she can attack with a Javelin from. Try to get her a couple kills this way.
-It may also be possible to feed 1-2 enemies from this first wave’s rush to Chrom. Look for non-Counter Fighters or Cavs.
-Have an unequipped Robin retrieve, then use the Master Seal. This will save the DM and Fighter for post-promotion EXP.
-If the very last wave of enemies has a lot of Counter on their melee (or Luna+ on the Killing Edge Myrm), you can draw them into the sands by taking out the DMs first. Kite around the Second Seal village enough and eventually the melee will split themselves up.
Cordelia Safe Kiting Spots
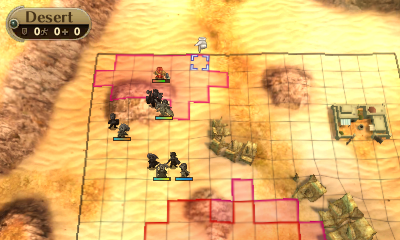
Revised Strat (No Rescue Charges)
-Deployment (left to right, top to bottom): Sumia, Cord, Fred, (blank), Chrom, Miriel, Robin, Lissa, (blank), Ricken
Turn 1
-Pair Fred to Cordelia. Move below Sumia, equip Javelin and wait.
-Move Miriel to Cordelia’s right.
-Move Ricken 1 tile right.
-Pair Gregor to Nowi and move 1 tile right, then 4 tiles up.
-Pair Chrom to Robin. Look at the skills of the DM and Cav east and south of the party. If they can kill Robin, attack the Myrm from 1 tile up and 1 tile left. Otherwise, attack from 2 tiles left.
-EP: Cordelia fights a DM, then Robin kills a DM and possibly the Cav.
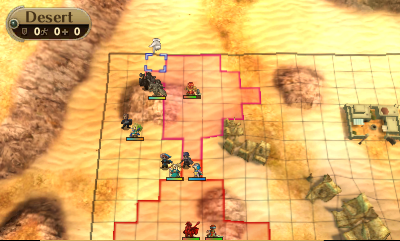
Turn 2
-If the Cav is still alive, kill it with Robin such that she ends her turn in range of at least 1 DM. If the Cav died on turn 1, then move Robin in range of as many DMs as possible (heal with items if necessary).
-Nowi’s movement requires a bit of adaptation. Ideally, she wants to move as far up as possible. If she’s not in attack range, she’ll want to unpair to maximize movement. However, if Robin had to move down to kill the Cav on this turn, there’s a high chance one of the DMs also moved down to overlap its range. In this case, Nowi will want to remain paired and move below Robin to take advantage of Solidarity.
-Pair Lissa to Sumia and Miriel to Ricken. There’s a 2×2 Hill near the top Village. One of the lower tiles on it, and the tile below that, will be out of enemy attack range.. In the rare case that both are free, the left side is preferred. Move Sumia to the safe Hill tile and unpair Lissa below her.
-Move Cordelia below Lissa.
-Move Ricken below Cordelia and unpair Miriel below him.
Turn 3
-Move everyone other than Robin out of danger. This should be largely trivial because everyone will have way more Move than the enemies while in the desert and the DMs will all be too far back to catch up. However, the previous turn may complicate Nowi and Gregor a little. If they were attacked, they will likely have to move and Transfer-pair to Lissa and Ricken in order to escape. In an even rarer case, Ricken may need to first move 2 tiles right of Miriel so that Nowi can Transfer-pair to them. If they were able to unpair, they can simply pair to Ricken and Miriel.
-Move Robin to fight as many DMs as possible (should be all remaining DMs in most cases).
-EP: DMs die.
Turn 4+
-If a DM survived, position Robin to kill it.
-Slowly kite the enemies across the top of the large Bones sections, then down the right side. This will generally mean moving 2-3 tiles at a time. It’s important to do this to prevent the mob of melee enemies from splitting up (the Cavs are prone to trying to come around the left side if the party is moving too fast).
-The end goal of the kiting is to have an unequipped Robin to the right of the lower-right corner of the Bones with Lissa right below her. This will jam up the melee and keep them from moving (even accounting for Pass on all of them). Robin may need healing, which is why Lissa is there (also to block the Pass tile). Have Cordelia trade Fred in for Chrom, then roam around the Bones looking for pick-offs. This strategy can get Cordelia to level 10 and Chrom as much as a level. Lissa also has some opportunity to pick up more EXP if she’s falling behind in Mag.
