
Pre-reqs:
-Fred and Robin should each enter the battle with a Vulnerary.
-Chrom and Avatar to have attained max support points, which is 12 points; 3 for attacking while paired, 1 for attacking while adjacent, with an additional 1 for dual striking while paired (my Prologue guide should bring in far more than enough unless Robin somehow crits everything). They need to collect 7 during this chapter to reach C support.
-Robin at 8 Mag or able to reach 7 Mag with Tomes C within her next 2-3 attacks.
-Enough stats going in such that leveling up to 8 can give enough durability to survive a 23 mt Luna+ with a Sully support, 10-11 healing in between (odds are Lissa should get +1 Mag over 2 levels), then with a Virion support and Woods tile (25 HP and 8 Def or 23 HP and 9 Def). This is pretty much entirely to deal with the boss having Luna+ and Vantage+ together (an 8% chance if all abilities have equal chance of being picked).
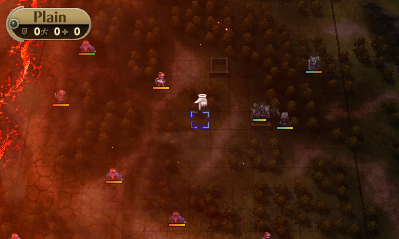
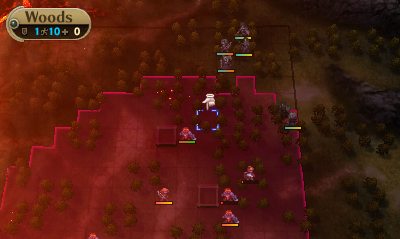
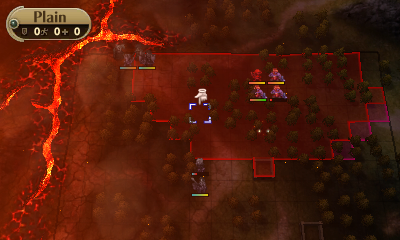
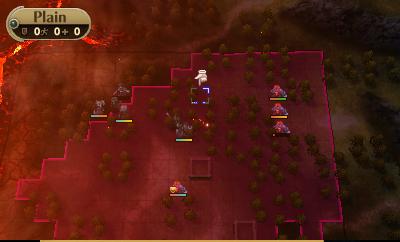
Turn 1
-Pair Fred to Robin
-Move Robin to the south Fort. Now this strat changes a bit depending on stats. If Robin has 10 Spd, then trade Fred the Bronze Sword and use that instead of the Silver Lance. Without HP+5, the Fighter will die, Fred will conserve lance uses and have a better hit chance to boot. It costs Robin some potential EXP, but it’s better for Fred to pick up the kill than for Robin or Chrom to risk taking damage. Anyway, switch to Fred and attack with the lance/sword.
-Make sure Chrom’s Rapier is equipped (backup ‘dual strike in case Robin misses that high hit chance’ strat), then move to the right of Fred. Trade back the Bronze Sword if Fred has it, then transfer Robin. Switch to Robin and kill the Fighter (if he’s not already dead; otherwise, moving here is for AI manipulation).
-Move Lissa 3 tiles down (seems to get better AI movement results over 4 tiles down).
-Enemy phase: No one in attack range, so they just close in.
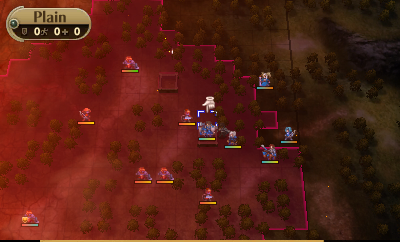
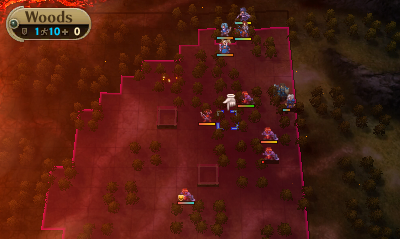
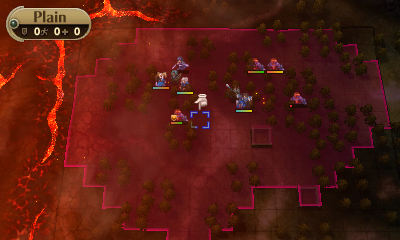
Turn 2
-Move Virion over to Fred, trade him the Elixir, unequip his bow, then pair onto Fred.
-Move Fred two tiles right. At most, he’ll have taken 12 damage. The Fort will heal him for 5, meaning a Vulnerary can put him at full, where, if he’s standing in the Woods, he can survive a round against both Mercs and a Fighter, even if all three have Luna+. If you want to be stingy about Vulneraries, assess his remaining HP against the output of those three (since Luna+ for all three is semi-unlikely).
-Move Robin 3 tiles right and 1 tile up. Drop Chrom below her (once again, seems to produce better AI movement results).
-Pair Sully to Lissa. Move Lissa to 1 tile above the Woods? and drop Sully to her right.
-Enemy phase: The bottom Merc will get himself insta-gibbed by the Silver Lance, the other will attack Fred from above and be left with 1 HP and the Fighter will be left with either 4 or 9 HP.
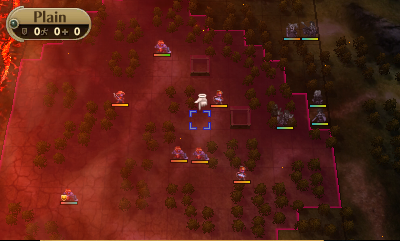
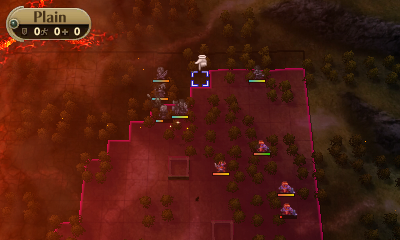
Turn 3
-Pair Chrom to Robin. Move Robin below Sully, equip the Bronze Sword, then transfer Chrom to Sully.
-Move Fred below Lissa. Transfer Virion to Lissa. Pair Fred to Robin.
-Move Lissa 1 tile left, 2 tiles up, then 1 tile left. Drop Virion above her.
-Move Sully 2 tiles left, then 3 tiles up. Drop Chrom above her.
-Enemy phase: Merc suicides on Robin (Fred has his lance for backup in case she misses). The three Fighters should move toward Robin. The Archer should move up to that Lissa is just out of his range. The Boss might move erratically, which is why I have two variations of turns from here.
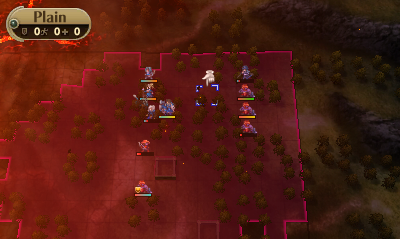
Turn 4A (Boss goes north; about 2/3 the time)
-Robin goes below Sully and transfers Fred to her, then pairs to Lissa.
-Lissa moves 2 tiles left, 1 tile up, then 2 tiles left. Switch to Robin, equip Thunder and use a Vulnerary.
-Move Virion to Robin’s right, transfer Lissa to him, then drop Lissa above him.
-Unequip Sully. Move Sully above Robin, switch, transfer Sully to Robin. Have Fred use an Elixir (it’s possible to substitute a Vulnerary or nothing at all if the Mercs and Fighter were wimpy enough; as well as the Boss and Archer being wimpy… but if they’re all that wimpy, why isn’t Robin Fort-tanking with Fred?).
-Move Chrom 1 tile down and unequip him.
-Enemy phase: Fighters all zerg toward Chrom. Archer ho-hums in the middle of the forest. Boss exchanges blows with Robin.

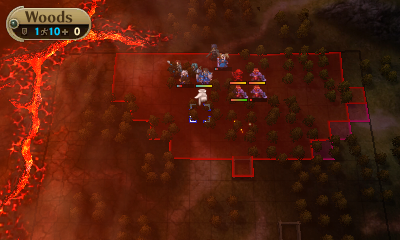
Turn 5A
-Pair Virion to Fred.
-Move Fred above the Boss and hit him.
-Pair Chrom to Lissa.
-Move Lissa above Robin and heal her.
-Move Robin into the Woods left of Fred and finish off the boss.
-Enemy phase: Lissa gets shot (but not doubled, thanks to Chrom). Fighters zerg.
Turn 5A Back-Up Plan
-If Robin whiffs, the enemies get out of formation (uncommon, but it happens) such that Lissa can’t safely heal Robin or Vantage+ would cause the Boss to kill Robin before she lands the finisher, there is some back-up movement that can be done. Note that this only works if Robin can survive a non-Luna+ hit from the Boss after a Vulnerary with no +Def pair-up bonus (even if the Boss has Luna+, this will still work since the AI disregards procs when doing calculations).
-Pair Virion to Fred and Chrom to Lissa as usual.
-Move Robin all the way to the left and use a Vulnerary. Move Lissa above Robin, transfer Chrom for Sully. Swap to Sully and make sure she’s unequipped if the Boss doesn’t have Hawkeye.
-Move Fred right below Robin.
-This allows Sully to soak a hit on EP, yet be able to disengage with everyone else on the next PP. However, from this point on, early improvising begins. The Boss should generally be way out ahead of his goons, though, so Robin has a decent chance of being able to just kite him down.
Turn 6A
-Things get a little messier here compared to route B, especially if the Archer has Luna+.
-Move Fred 1 tile up, then 5 tiles left. Switch to Virion.
-Move Lissa to the right of Fred. Switch, then transfer, then switch, such that the pair now in range of the Archer is Fred/Chrom.
-Move Robin straight down as far as she can and drop Sully below her. If she pairs onto Sully next turn, she can get a ton of mobility.
-Enemy phase: Archer shoots Fred. Fighters zerg toward. After this, it more or less goes into general strats, since the enemies start to move erratically. Except there’s an Archer instead of just three Fighters. Divide and conquer is the name of the game.
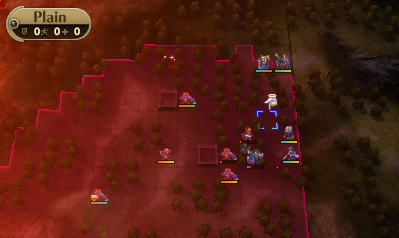
Turn 4B (Boss goes south for some inexplicable reason; about 1/3 the time)
-Robin equips Thunder, then goes below Sully and transfers Fred to her, then pairs to Lissa.
-Lissa goes four tiles left. Take an assessment of Robin and see if she can take a hit from the Archer (17 attack; -1 for Woods tile, -2 or -1 for support and support against Luna+, respectively). If so, switche to Robin to equip Thunder, then switch back and drop Robin below Lissa. Otherwise, drop Lissa below Robin.
-Sully goes 1 tile down, 4 tiles left, then 1 tile down. Switch to Fred, transfer Sully to Robin/Lissa (whoever was dropped). Use an Elixir with Fred (it’s possible to substitute a Vulnerary or nothing at all if the Mercs and Fighter were wimpy enough; just make sure Fred has 9 HP if the Boss doesn’t have Luna+ and 17 HP if the boss does have Luna+).
-Move Virion above Lissa.
-Move Chrom 1 tile down and unequip him.
-Enemy phase: Archer will attack Robin. A Fighter will attack Chrom.
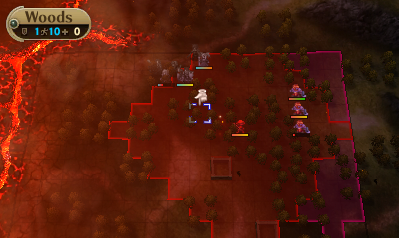
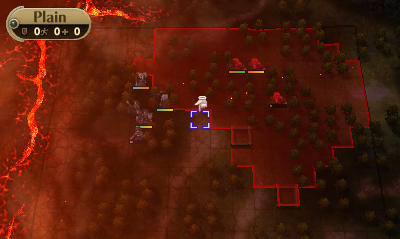
Turn 5B
-Move Fred below Robin/Lissa (whoever was dropped), transfer Sully back to him and attack the Archer.
-Move Robin to the left edge of the second row from the top of the Boss’s attack range (his movement can vary a bit from the screenshot, but usually won’t). If Lissa’s healing won’t bring Robin back to full HP, use a Vulnerary.
-Move Lissa left of Robin and heal.
-Pair Chrom to Virion.
-Move Virion above Robin. Switch and transfer Virion to Robin.
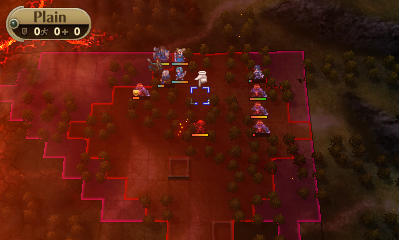
-Enemy phase: Boss moves to attack Robin.
Turn 6B
-Boss movement will vary a bit, but it should place him on a Plains tile.
-Move Fred beside the boss and attack. Just make sure it’s out of range of the Fighters (most of the time, it’s the tiles to the Boss’s left and below him that are safe).
-If the Boss has Vantage+, heal Robin with Lissa, then move Robin to finish off the Boss. If the Bronze Sword does enough damage to kill him, consider using the other adjacent to attack with it (5 extra hit, 1 damage reduction). Otherwise, use Thunder.
-Move Chrom as far down as he can.
-Enemy phase: Fighters zerg. This is where they kind of break off and start moving more randomly when not in range of a target, so I cover more general strats in the section below.
General Strat — the Rest of the Map
-Make sure to set Robin/Chrom up to fight at least two more battles together
-Fred has already fought three battles with Virion. If on route B, try to get a fourth by having Virion take a potshot with Fred unequipped. Evidently, they can C support after chapter 1.
-Use the diagonal formation with Fred and Sully to allow Robin to take a fight, then escape getting cornered via the transfer-pair combo
-Heal with Lissa, if necessary, using Virion, Sully or Fred as a paired escape point. If both are fleeing together, leapfrog to essentially gain an extra point of movement.
-Unpaired Virion placed near the fringe of enemy ranges can bait them away from Robin. This is because Virion’s stats are so bad and they think they can corner him. If unpaired Fred or Sully are on stand-by within his movement range, then he can just pair onto them to avoid being trapped. Doing this repeatedly can have Virion lead them on a merry chase.
-If this is coming in from variation A, try to kite so that the Archer ends up in front of the Fighters. This should make it so Robin can duel him and since he’s out front with the most range, the Archer will be the only one to end up engaged.
-Once there are only 1-2 Fighters left, if healing charges are at 10 or less, try to conserve them and any remaining items for chapter 2 by kiting to allow Robin a turn or two sitting on the Fort to heal. Sometimes Sully or Fred near the border of their attack range will provoke them. Also try to conserve Thunder (kinda just guessing now, but I’m thinking ~6 uses, preferably more) by engaging with the Bronze Sword where able (be careful to only engage one, depending on stat luck, as Luna+ Hammer and Luna+ Iron Axe together are still deadly).
